Unit testing part 2: Getting started with TDD

This series of posts accompanies a talk I give about unit testing with the xUnit test framework. Any reader who saw my talk can use this as a reference, others can use this as a starting point to write even better maintainable and reliable code. In my talk, I highlight patterns that work well with easily testable code and combine it all into a working application. All code from these articles can be found in a repository on my GitHub account.
Now that I've explained why I write tests and prefer the xUnit framework, lets write some actual tests. The application I'll write will run in the Iron Man suit. Unfortunately building such software without errors is reserved for geniuses such as Tony Stark. Believe me, I tried. So I will just build a simple (and very fake) weapons module as backdrop for displaying unit test functionality. The basics of Test Driven Design (TDD) will be explained along the way.
The three states
I start with creating a solution for the Iron Man weapons module. I add a class library project to the solution which I use as test library. According to TDD, the first thing I write is a test. No code gets written before I have a test. This follows a principle called red-green-refactor. First I write a failing tests, thus my test is in the red state. Next I write as little code as I can to make the test pass, thus my test enters the green state. When I have verified that my test works correctly, I can expand the test to check for the next thing it should do. This is the refactor state. I write more of the test, which sets the red state again, to then add code to move to the green state and finally I can go to the refactor state and continue to write my test. The circle goes round and round until I am satisfied with the result.
So, I add a class to the project IronMan.UnitTests and call it MissileTests, because I want to write a module that fires missiles.
Installing xUnit
Because I don't have xUnit installed yet, this is my next action. I install xUnit via right-clicking on the References map and clicking Manage NuGet Packages..., I select the Browse tab and search for "xunit". I select the first package (authored by Brad Wilson and James Newkirk) and click install. I get a view that looks like this:

Alternatively, I can add it via the package manager console found via Tools > NuGet Package Manager > Package Manager Console by executing the following command:
Install-Package xunit
Naming tests
Now that I have my test framework installed, I can write my first test. I do this by writing a [Fact] attribute followed by the test method. As a best practice, this method follows the convention of a public void signature. I personally like to use the When_...then_... type of name for my tests. This nicely describes the expected behaviour. Sometimes the resulting name is weird. Above all, the name should explain what is being tested. In test method names, I use underscores instead of spaces to make it abundantly clear that this is a unit test. So the name of my first test is _When_firing_a_missile_then_..._
Well, then what? Something should happen. This gets me thinking about the launch sequence. I'm not just firing a missile, I'm launching it from somewhere. From a missile launcher. This launcher can also keep track of how many missiles I have left and further down the line I have options to expand upon it. The first thing I need to do, is rename my test class because it's not up to date any more. These tests will not test the missile, these tests will test the launcher.
In TDD, this is an incredibly important step. No code is written in stone! Adapt, update and change, but only when necessary. Thus, I change the name of MissileTests to LauncherTests. This gives me the opportunity to write a decent test name that describes what I want to test: _When_launching_a_missile_then_missile_count_should_decrease_by_1_.
The three parts
As we all know, all good things come in threes. I described the three stages of a test earlier, now I shall describe the three parts of a test: arrange, act and assert.
In the first part, the arrange declares what code I want to test. This is where I prepare the class that will be tested. I instantiate a new Launcher which I will test. Since I have no Launcher class yet, this is where my test enters the red stage.
Some developers like to create the Launcher class below the test class in the same file so they can experiment quickly with code. Here, I'm not going to do that because I want to show separation of concerns. The Launcher class belongs in its own project: IronMan.Weapons. After creating the project and the class, I add a reference in the test to the new Launcher class.
Now that the test is in the green state again, I'll continue with refactoring the test. Which brings me to the next part: the act. In the act, I will execute the method I want to actually test. In this case, I want to launch a missile, so I call the Launch() method. I don't have a Launch() method (red state), so I write it (green state) and continue (refactor state) to the last part.
In the last part of the test, I am going to describe the desired behaviour: I'm going to assert what I want the outcome to be. This part will let my test know whether it passes or fails. So what behaviour do I want to verify? It's described in the test name: then missile count should decrease by 1. At the moment I don't have any missiles to fire, so I will have to update my Launcher class to comply with the desired behaviour.
In the next chapter I will describe why I do the things I do, for now just follow along.
In the Launcher class, I add a private field ICollection<IMissile>, named missiles. The IMissile is an unknown type and I will fix that in a moment. To add the desired behaviour, I update the Launch functionality by adding code that finds the first missile and removes it from the collection. Because I want to have missiles available when I call the Launch method, I inject a collection of missiles and save those in the missiles field. I also add a readonly property int MissileCount { get; } that returns missiles.Count.
Next I add a new project called IronMan.Core to the solution. In that project, I add the interface IMissile and I add a reference in the Launcher class. This clears up any errors I have in this class.
Because of all the changes in the Launcher class, the test class is in the red state again. To solve that, I add a NuGet package called Moq. This lets me easily add fake implementations of classes and interfaces. In the arrange part I create a new Mock<IMissile>, pass the Object property on to a collection and pass that collection to the Launcher class.
Now that the test is green again, it's time to write the actual assert that describes the behaviour under test. xUnit has a nice assertion framework build in, that is accessible via the static Assert class. It has different ways to verify that the missile count was decreased by one. I can compare the actual count with a predetermined outcome (because I expect that outcome) through the Assert.Equal method. Another way is to check whether the MissileCount equals 0 via Assert.True method.
For a number of assertion methods, I can add additional information in the form of a custom message. There are also other assertion methods to check all sorts of expected behaviour such as checking for a type, seeing if an exception is thrown and for each check there is also its negative check: NotEmpty, NotEqual, False, IsNotType, etc.
In a test, write as little assertion logic as necessary, it will make the expected behaviour easier to understand.
So how does my test look like?
[Fact]
public void When_launching_a_missile_then_missile_count_should_decrease_by_1()
{
// assert
var mockMissile = new Mock&lt;IMissile&gt;();
var launcher = new Launcher(new List&lt;IMissile&gt; {mockMissile.Object});
// act
launcher.Launch();
// assert
Assert.Equal(0, launcher.MissileCount);
Assert.True(launcher.MissileCount == 0, &quot;Missile was not launched&quot;);
}
The details
Now why would I put my code in two different projects and put so many thought into separating my classes?
Let me start with the Launcher class. The easiest solution would be to make a class Missile and just have a List of Missile as property. That would mean that I can only use the default List to store missiles and that only one type of missile would be accepted. When I want to change anything in the Missile class, I would have to do so in the class itself and that could, over time, present problems. Remember the Open/closed principle. With an interface, I have the freedom to implement different missiles and optimise them individually. This ties in with the Dependency Inversion principle. I'm not letting the Launcher class be dependent on one type of missile, I give it the freedom to use different types of missiles. This is accomplished by using dependency injection.aspx) to make sure the Launcher class has all the parts it needs to function correctly, but doesn't need to know where they came from. I will go into more detail in dependency injection in a later blog post.
Now that the Launcher is dependant on an interface, I can easily give it a fake implementation in my tests. This assures me that I'm only testing the Launcher class and I'm not focused on whether the type of missile will have an influence on the outcome of the test. It also means that I can control return values from any methods that will be called. That is where Moq comes into play. For a full description of that framework, visit their GitHub or google what you want to know. The short version: Moq lets me quickly add fake implementations of interfaces and classes. It gives me control over the mocked object's setup and return values. It even lets me verify whether methods are called on the mocked object so I can check that the correct methods are being called. It won't fit all scenarios, but it covers the majority of problems I have encountered so far.
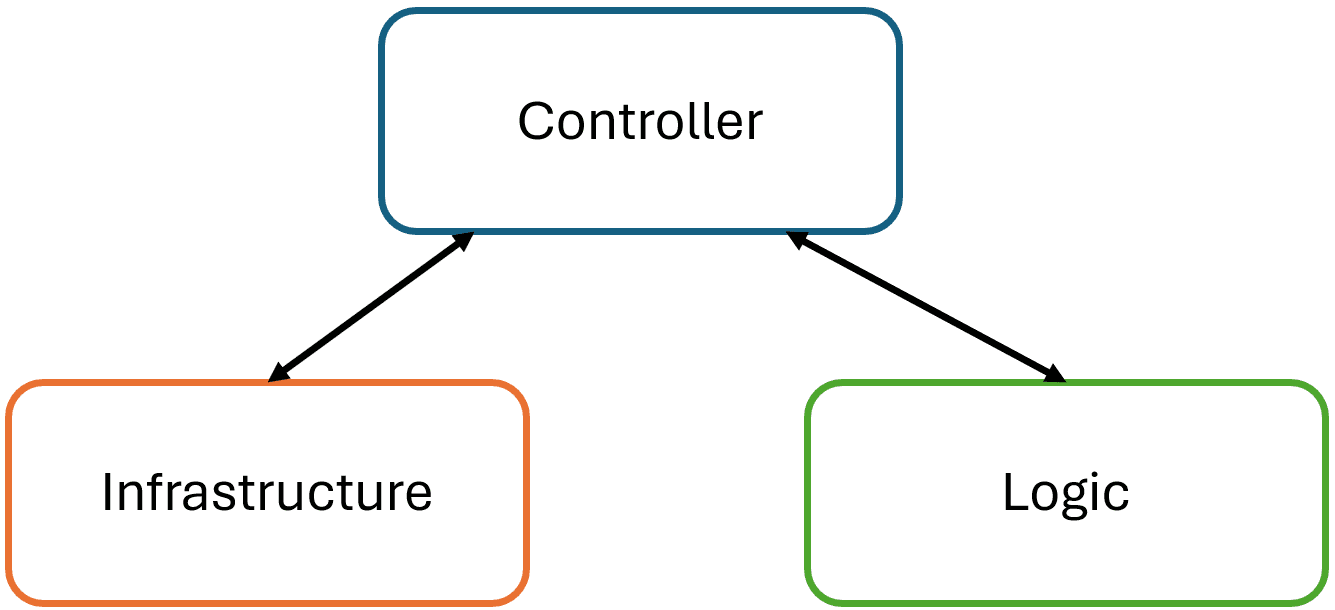
The reason I put the IMissile interface in a separate project is because I want to pass the IMissile interface to several other projects. I build this according to an architectural style called the onion architecture. This architecture describes that the logic of an application is in a few classes and interfaces at the core of that application. Implementation details are pushed outward, the application is not interested whether it stores data in a relational or document database, it just needs to know that it can store data. In this example the suit doesn't care what missiles there are, just that it has them and can fire them. I could have put an ILauncher interface next to the IMissile interface, but this is just a demo application to touch upon these subjects.
As a last part of the details, I would like to highlight two other assertion frameworks. Shouldly makes single asserts very readable. It adds extension methods to common types so test asserts can almost read as a sentence. It also has more descriptive output when a test should fail. FluentAssertions makes multiple asserts a lot simpler by creating a fluent API to verify all conditions.
Conclusion
If you only remember three things, let it be these three:
- No code is written in stone, but only change your code when it is necessary;
- Go through the three stages of the test: red, green and refactor;
- First arrange the system to test, then act on that system and assert the expected behaviour.
In the next post in this series, I'll explain how to execute this test so we can see whether it fails or succeeds. If anybody notices any inconsistenties, please contact me on twitter or via email.